APPPG Procedure - Hysterosalpingo-Foam-Sonography (HyFoSy) and Hysterosalpingo-Contrast-Sonography (HyCoSy)
Indications:
- Evaluation of uterus:
- Abnormal uterine bleeding.
- Uterine cavity evaluation, especially relating to uterine leiomyomas, polyps, synechiae, and isthmoceles
- Further assessment of abnormalities detected on transvaginal ultrasound, including focal or diffuse endometrial or intracavitary abnormalities.
- Congenital or acquired abnormalities of the uterus.
- Infertility.
- Recurrent pregnancy loss.
- Suboptimal visualization of the endometrium by standard sonography.
- Evaluation of fallopian tubes:
- Infertility
- Follow-up of sterilization procedures
- Patients prior to or after tubal surgery, selective salpingography, and tubal recanalization or other intervention
- Patients prior to treatment with assisted reproductive technologies
Contraindications
- Suspicion of pelvic inflammatory disease or other vaginal infection
- Symptoms of cervicitis
- Pelvic tenderness
- Abnormal vaginal discharge
- This test is NOT recommended for evaluation of known hydrosalpinx or strong suspicion of hydrosalpinx
- Endometriosis (relative contraindication)
- History of ectopic pregnancy or prior fallopian tube surgery
- Active vaginal bleeding
- Spotting is acceptable
- Possibility of pregnancy and no recent pregnancy test
- Current or recent pregnancy (previous 6 weeks) including miscarriage which may increase the risk of air embolism
Risks
- Infection
- Uterine perforation
- Both extremely rare
- Spotting or bleeding
Pre-Procedure
- Scheduled early follicular phase (CD 5-12) or at any time on oral contraceptive pills. They patient should no longer be bleeding from menses, lining should be thin, no obvious signs of recent ovulation, and possibility of pregnancy minimized. The procedure should be performed prior to ovulation and appropriate dates for testing should be adjusted if the patient experiences shorter cycles
- Serum pregnancy test since first day of last menstrual period OR urine pregnancy test required on day of procedure (even in patients with no possibility of pregnancy ex TDI)
- Patients should take 800 mg ibuprofen 1 hour prior to procedure. Acetaminophen 1000 mg is appropriate alternative in those who cannot tolerate ibuprofen
- Confirm no allergies to Latex or Betadine. If allergies are present, the room will be prepared with the latex-free TVUS probe cover for latex allergy, and a 2–4% chlorhexidine gluconate for alternative cervical prep for those with allergies to Betadine.
Procedure
- Provider to review expectations, risks and alternatives and obtain verbal consent to proceed. A “time out” should be performed per practice specific policy. Pt to assume lithotomy position.
- Provider dons NON-STERILE gloves
- Per provider discretion, a transvaginal ultrasound (TVUS) may be performed pre-procedure to assess the angle of the uterus and aid in catheter placement placement. If a pt has not had a prior ultrasound, adnexa may be assessed for hydrosalpinx at this point.
- Provider doffs non-sterile gloves and dons STERILE gloves
- Speculum is inserted and cervix prepped with betadine (or chlorhexidine if iodine allergy) in the usual fashion.
For HyCoSy procedure using saline air contrast device [FemVue®]
- Completely submerge device tip in sterile saline-filled bowl. Fully pull back plunger handle and keep tip submerged until saline chamber is completely filled to the 10 mL mark, as confirmed visually. Device fills with a delay.
- Insert catheter:
- Remove crimped sleeve from catheter tip
- Advance the insertion sheath so that the distal end of the catheter protrudes slightly from the distal end of the sheath
- Advance the catheter with insertion sheath through the vagina to the external cervical os
- Using the insertion sheath as a guide, advance the catheter through the cervix and into the uterine cavity
- Inflate balloon with air or saline and position above internal cervical os. (Saline filled balloon may allow for better visualization by not obstructing uterine cavity.)
- Remove speculum.
- With a saline-filled syringe, perform uterine cavity evaluation per practice guidelines.
- After SIS, clamp catheter and detach saline syringe from catheter luer. Keep balloon inflated and maintain catheter position.
- Ensure the device's saline chamber is filled to the 10mL mark. Submerge device tip into the sterile saline-filled bowl and slowly press down on the plunger handle until bubbles are visible within bowl.
- Attach luer of primed device to catheter's luer.
- Insert ultrasound probe. While maintaining traction on balloon catheter, obtain sagittal view and slowly depress plunger handle to deliver saline-air contrast.
- Confirm no contrast flowing back into the cervix and through the external cervical os. If backflow is observed, adjust the balloon to create a more adequate cervical seal.
- Switch from sagittal view to transverse view and continue slowly pressing on plunger handle. Observe bubbles filling uterine cavity.
- To assess contrast flow, focus probe on either the left or right cornu. Scan from the cornu, through the tubal course, and over to the ovary.
- Following the same steps, evaluate the contralateral tube.
- When appropriate images have been obtained, deflate the balloon and remove the catheter. If the balloon was in the lower uterus, ensure additional saline images are obtained after balloon removal to fully assess the lower cavity, including a cesarean scar niche, if present
For HyCoSy procedure using 30 mL syringe:
- Prepare and insert catheter:
- Fill a 30 mL syringe with 15 mL of sterile water and 15 mL of air and attach to the balloon catheter
- Tilt the syringe so the water is at the tip of the syringe and prime the balloon catheter with sterile water
- Advance the insertion sheath so that the distal end of the catheter protrudes slightly from the distal end of the sheath
- Advance the catheter with insertion sheath through the vagina to the external cervical os
- Using the insertion sheath as a guide, advance the catheter through the cervix and into the internal cervical os
- Inflate balloon with air and position above internal cervical os.
- Remove speculum.
- Tilting the syringe so that the saline is at the tip of the syringe, insert ultrasound prob and perform uterine cavity evaluation per practice guidelines. Utilize the minimum amount of sterile saline that allows distention.
- After SIS, tilt the syringe so that the air rises to the tip of the syringe. Keep balloon inflated and maintain catheter position.
- While maintaining traction on balloon catheter, obtain sagittal view and using pulsatile pressure, advance air bubbles through the catheter
- Switch from sagittal view to transverse view and continue slowly pressing on plunger handle in a pulsatile manner. Observe air bubbles in uterine cavity.
- To assess air bubble flow through the tubes, focus probe on either the left or right cornu. Scan from the cornu, through the tubal course, and over to the ovary. Obtain a cine clip of flow of air bubbles through the adnexa if possible.
- Following the same steps, evaluate the contralateral tube.
- When appropriate images have been obtained, deflate the balloon and remove the catheter. If the balloon was in the lower uterus, ensure additional saline images are obtained after balloon removal to fully assess the lower cavity, including a cesarean scar niche, if present.
For HyFoSy [ExemFoam ®] Procedure: *This may be performed in conjunction with SIS or as an independent test
- Prepare and insert catheter:
- Fill a 30 mL syringe with sterile water and attach to the balloon catheter
- Prime the balloon catheter with sterile water
- Advance the insertion sheath so that the distal end of the catheter protrudes slightly from the distal end of the sheath
- Advance the catheter with insertion sheath through the vagina to the external cervical os
- Using the insertion sheath as a guide, advance the catheter through the cervix and into the internal cervical os
- Inflate balloon with air and position above internal cervical os.
- Remove speculum.
- With a saline-filled syringe, perform uterine cavity evaluation per practice guidelines. Utilize the minimum amount of sterile saline that allows distention.
- After SIS, clamp catheter and detach saline syringe from catheter luer. Keep balloon inflated and maintain catheter position.
- Attach the two syringes provided in kit with the supplied luer. Mix the gel to create a foam as described in by manufacturer to create a foam (about 10 passes of gel through the luer is typically required)
- Attach luer of primed foam to catheter's luer.
- Insert ultrasound probe. While maintaining traction on balloon catheter, obtain sagittal view and slowly depress plunger handle to deliver the foam.
- Confirm no contrast flowing back into the cervix and through the external cervical os. If backflow is observed, adjust the balloon to create a more adequate cervical seal.
- Switch from sagittal view to transverse view and continue slowly pressing on plunger handle. Observe foam filling uterine cavity.
- To assess contrast flow, focus probe on either the left or right cornu. Scan from the cornu, through the tubal course, and over to the ovary. Obtain a cine clip of flow of gel through the adnexa if possible.
- Following the same steps, evaluate the contralateral tube.
- When appropriate images have been obtained, deflate the balloon and remove the catheter. If the balloon was in the lower uterus, ensure additional saline images are obtained after balloon removal to fully assess the lower cavity, including a cesarean scar niche, if present. This may be difficult if gel remains in the lower uterus.
Post-Procedure
- After the procedure is complete, the patient may sit up, or remain supine for additional discussion of the results. Should symptoms of a vasovagal reaction occur (ex. nausea, dizziness, flushing), return the patient to supine and symptoms will typically resolve with time, cool pack, and juice/crackers.
- Patient will be provided with a sanitary pad/wash cloth and post-procedure instructions, including expectations for bleeding/pain management and to minimize infection risks.
- Avoid intercourse/tampons/douching for 24-48 hours. These recommendations may vary. Please refer to practice guidelines.
- Call with the following:
- Heavy bleeding
- Severe abdominal pain
- Fever/chills
- Abnormal vaginal discharge
- Provider reviews results briefly with patient. If there are inconclusive or abnormal findings, the final plan will be set by the Provider of Record after direct review of the findings.
- Patient advised to reach out to their care team with any additional questions or concerns.
- Provider to document findings appropriately per individual practice guidelines. Finding should be described by their appearance and no diagnosis given as no pathology has been obtained (I.e. “filling defects” or “hyperechoic lesion”) with measurement provided. Filling defects- note size, location and what the findings suggest. Examples:
- Rounded filling defect in the (location), suggestive of intrauterine polyp
- Intracavity filling defect (note size/location), and additional contrast required to distend cavity.
APPENDIX A
Normal Cavity
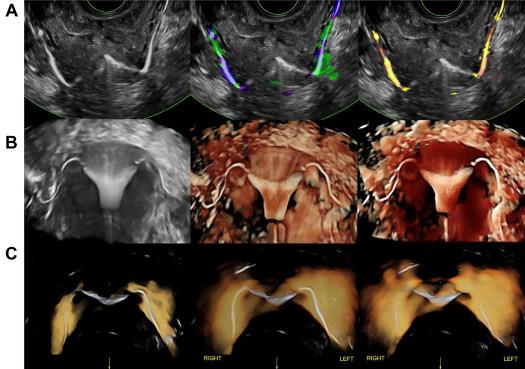
Tubal patency visualized
Endometrial polyps (“Hyperechoic lesions/filling defects”)
Fibroids (“Hyperechoic lesions/filling defects”)

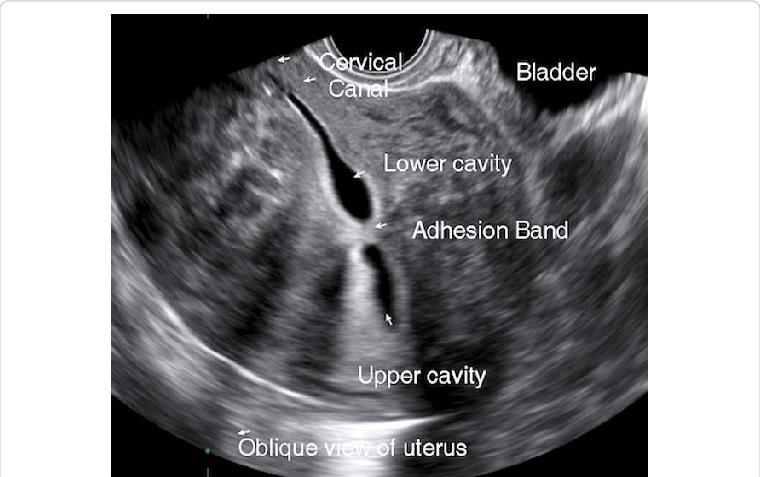
Adhesions (“hyperechoic band-like lesions”)
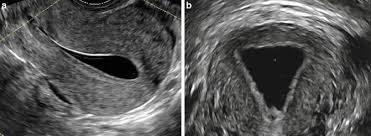
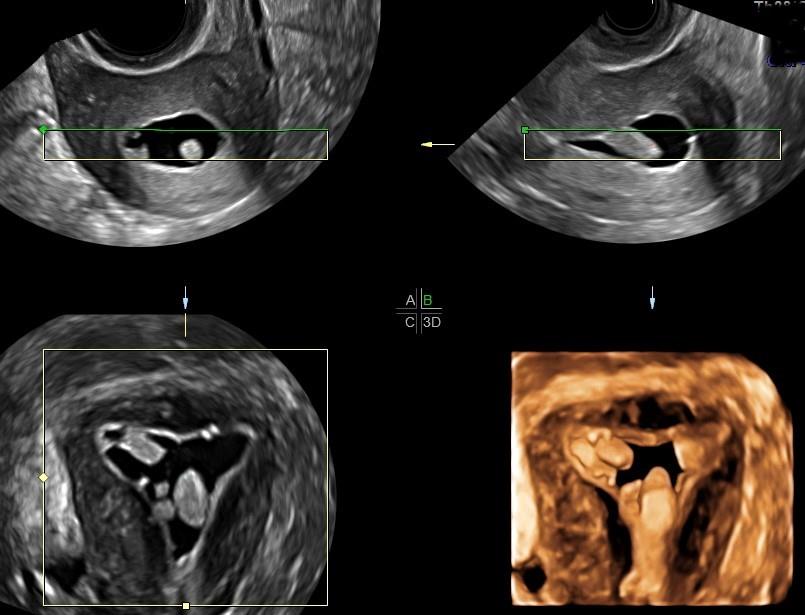
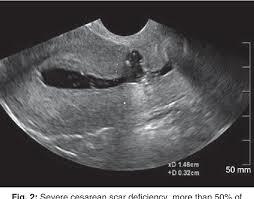
Isthmocele
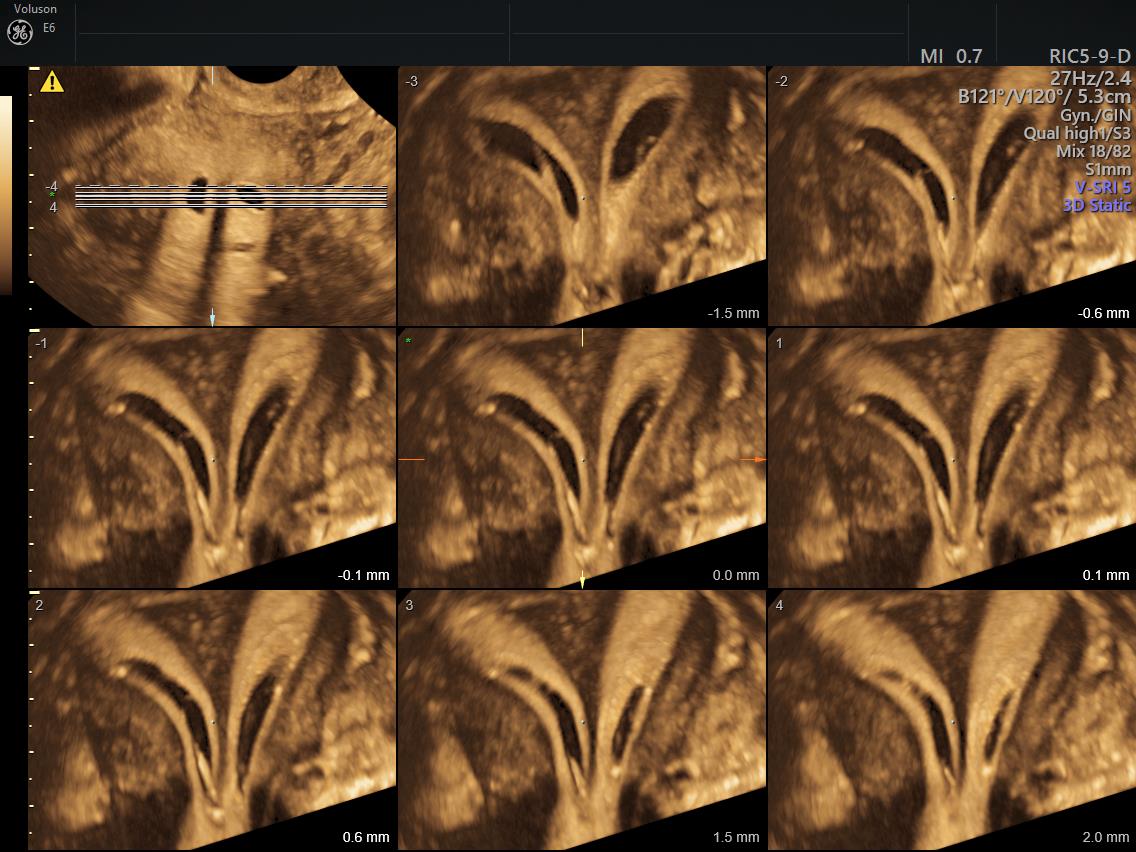
Septate vs bicornuate- septum vs bicornuate may be difficult to distinguish on HSG- recommend MRI or 3D US. Examples
- The cavity fills with a small triangular shaped indent of the fundus, suggestive of arcuate uterus vs septum
- The cavity fills as two symmetric horns, suggestive of septate vs bicornuate uterus
- The cavity fills as two distinct, closely approximated symmetric uterine horns, suggestive of septum. Cannot r/o bicornuate.
- The cavity fills as two distinct, symmetric divergent uterine horns. The angle between is suggestive of a bicornuate uterus.
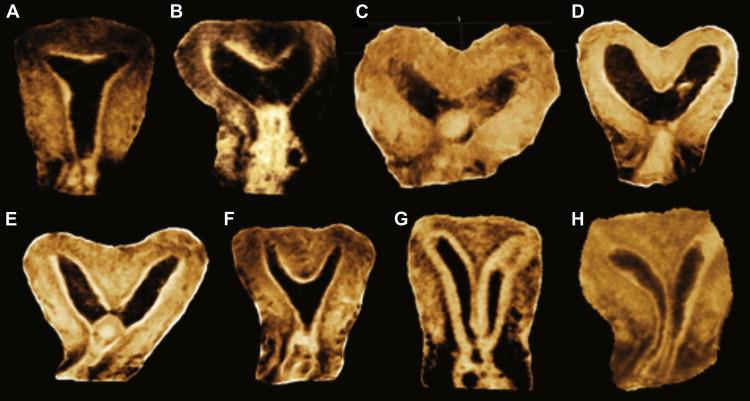
- (A) Normal uterus; (B) Arcuate uterus; (C, D)Bicornuate uterus; (E, F, G) Partial septate uterus; (H) Complete septate
Unicornuate vs didelphys
- Unicornuate
- The cavity fills as a single elongated cavity deviated to the (right/left) with a single fallopian tube (document fill/spill). Only a single cervix is seen on exam.
- Impression: (Right/left) unicornuate, MRI may be considered to identify a non-communicating horn and to r/o a didelphys.
- Didelphys
- Two cervixes are recognized and cannulated for exam (document location and difficulty of identifying each cervix). HSG demonstrates two distinct, widely divergent uterine cavities, each with fallopian tube. (document fill/spill for each).
Adenomyosis
Borders of cavity are irregular with small diverticula, suggestive of adenomyosis
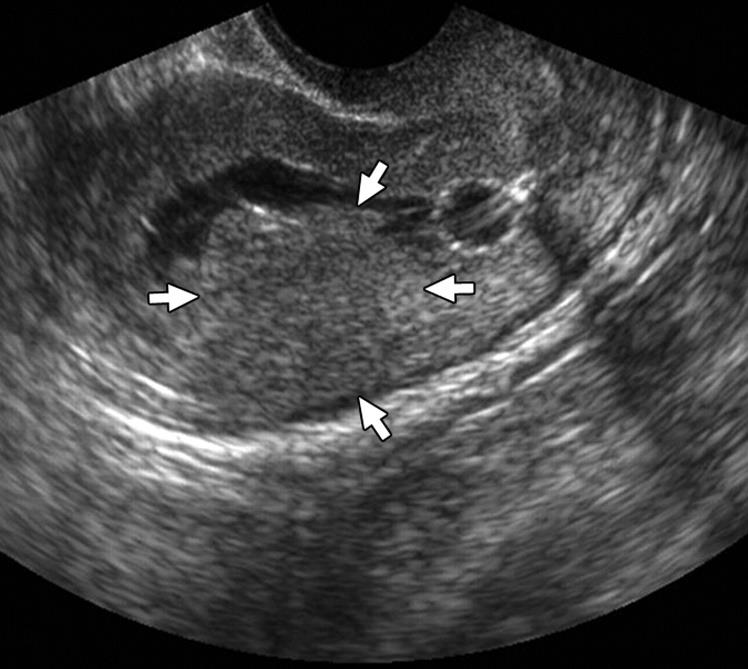
- Small circular filling defects in early fill move and clear, c/w air bubbles rather than true filling defect
Tubes
No tubal fill or spill, despite additional time and contrast. Proximal obstruction vs tubal spasm.
References
- Abdel-Gadir, A. (2019). The measurable and unmeasurable visual benefits of 3D saline infusion sonohysterography. Journal of Clinical Case Reports, 9(3). DOI: 10.4172/2165-7920.10001220
- ACOG technology assessment no. 8: Sonohysterography. (2016). Obstetrics and gynecology, 119(6), 1325. https://doi.org/10.1097/AOG.0b013e31825af435
- Ahmadi, F., Akhbari, F., Niknejad, F., & Kurjak, A. (2014). Various Types of Niche Imaging by Sonohysterography: A Pictorial Review. Donald School Journal of Ultrasound in Obstetrics & Gynecology, 8, 311-315. DOI:10.5005/JP-JOURNALS-10009-1369
- Bohîlțea, R. E., Mihai, B. M., Stănică, C. D., Gheorghe, C. M., Berceanu, C., Dima, V., Bohîlțea, A. T., Neagu, S., & Vlădăreanu, R. (2022). Technical Tips and Tricks after 10 Years of HyFoSy for Tubal Patency Testing. Journal of clinical medicine, 11(19), 5946. https://doi.org/10.3390/jcm11195946
- Brown, W. (2011). Sonohysterography. In B. R. N. B Rizk (Eds.) Ultrasonography in reproductive medicine and infertility. Cambridge University Press. https://doi.org/10.1017/CBO9780511776854.007
- Campbell, S., Bourne, T. H., Tan, S. L., & Collins, W. P. (1994). Hysterosalpingo contrast sonography (HyCoSy) and its future role within the investigation of infertility in Europe. Ultrasound in obstetrics & gynecology : the official journal of the International Society of Ultrasound in Obstetrics and Gynecology, 4(3), 245–253. https://doi.org/10.1046/j.1469-0705.1994.04030245.x
- Devine, K., Dolitsky, S., Ludwin, I., & Ludwin, A. (2022). Modern assessment of the uterine cavity and fallopian tubes in the era of high-efficacy assisted reproductive technology. Fertility and Sterility, 118(1), 19-28. https://doi.org/10.1016/j.fertnstert.2022.05.020
- Femvue. (2020). Procedure Guide. https://hcp.femvue.com/downloads/02446%20R00,%20FemVue%20Procedure%20Guide.pdf
- Fertility Institute of Hawaii. Saline infusion sonohysterogram. Retrieved 12/18/24 from https://www.ivfcenterhawaii.com/fertility-testing/what-is-a-saline-infusion-sonohysterogram-sis/
- GE Healthcare. (2018, Jan 18). Saline sonogram is a growing first-line option for diagnosing the cause of infertility. https://www.volusonclub.net/empowered-womens-health/saline-sonogram-is-a-growing-first-line-option-for-diagnosing-the-cause-of-infertility/
- GE Healthcare. (2019, Dec 25). Improving the diagnosis and treatment of uterine malformations with 3D Ultrasound. https://www.volusonclub.net/empowered-womens-health/improving-the-diagnosis-and-treatment-of-uterine-malformations-with-3d-ultrasound/
- Ludwin, A., Pityński, K., Ludwin, I., Banas, T., & Knafel, A. (2013). Two- and three-dimensional ultrasonography and sonohysterography versus hysteroscopy with laparoscopy in the differential diagnosis of septate, bicornuate, and arcuate uteri. Journal of minimally invasive gynecology, 20(1), 90–99. https://doi.org/10.1016/j.jmig.2012.09.011
- Maheux-Lacroix, S., Li, F., Laberge, P. Y., & Abbott, J. (2016). Imaging for Polyps and Leiomyomas in Women With Abnormal Uterine Bleeding: A Systematic Review. Obstetrics and gynecology, 128(6), 1425–1436. https://doi.org/10.1097/AOG.0000000000001776
- Verma, S.K., Lev-Toaff, A. S., Baltarowich, O.H., Bergin, D., Verma, M. & Mitchell, D.G. (2009). Adenomyosis: Sonohysterography with MRI Correlation. American Journal of Roentgenology, 192(4). https://doi.org/10.2214/AJR.08.1405